- Print
- DarkLight
- PDF
Turning in an Asset with Accessories
The Turn In screen is used to process the return of assets previously assigned to staff or students. It is optimized for use with barcode scanners to streamline the turn-in process.
You can also turn in accessories, such as chargers or cases, along with the main asset. When processed this way, accessories are not treated as individual assets but are recorded as being returned with the device. Alternatively, you may choose to allow users to retain accessories—like a charger or case—for use in future school years.
To enable accessory turn-ins, a specific setting must be turned on.
To activate this feature, go to the Turn In screen and click the Settings button in the upper-right corner.

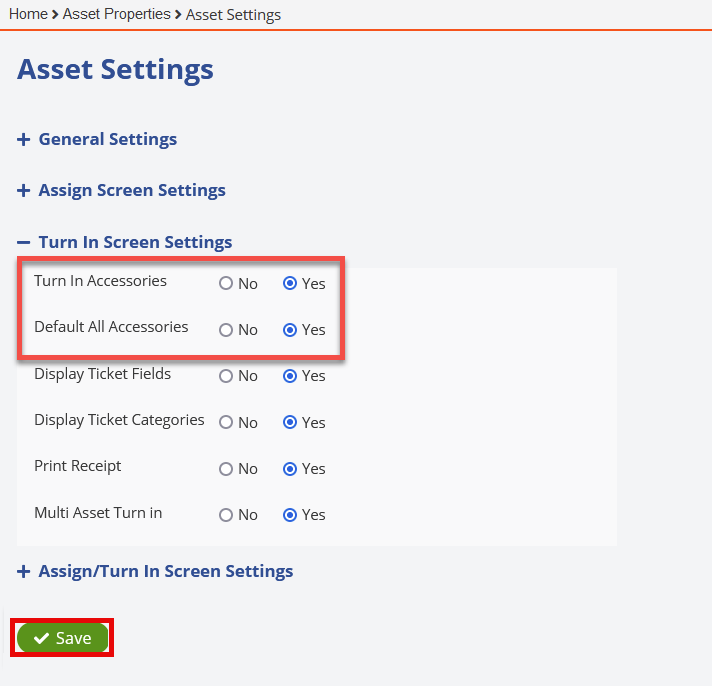
Then, click Turn In Screen Settings to expand the section.
In this section, locate the Turn In Accessories option and set it to Yes to enable accessory turn-ins.
You can default the Case and Charger accessories to be automatically selected for turn in by turning on the Default All Accessories option as well.
Once you've made your selections, click ![]() to apply the changes.
to apply the changes.
To return to the Turn In screen, simply click the Turn In tab in the left-hand menu.

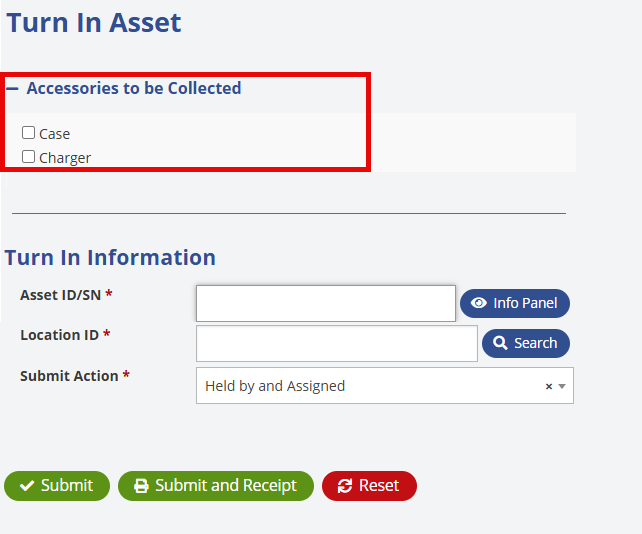
When you return to the Turn In screen, the Accessories to be Collected section will appear above the main details. You may select one or both accessories to include them in the return.

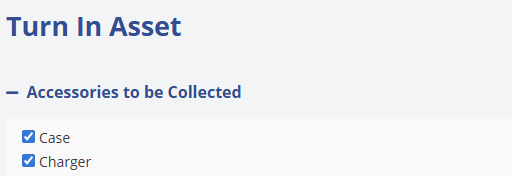
If the Default All Accessories option was enabled, both Case and Charger will be checked by default, as shown below:

From here, you can begin the asset turn-in process by following these steps:
Select Accessories to Be Turned In
Check the box for Case, Charger, or both to indicate which accessories are being returned.If you enabled the Default All Accessories setting, both options will be pre-selected automatically.
Once selected, these accessory options will remain checked to save time when turning in multiple assets.Enter Asset ID
Scan or manually enter the Asset ID or Serial Number in the Asset ID/SN field.Enter Location ID
Scan or enter the Location ID in the corresponding field.
Alternatively, click the button next to the field to open the Location Search dropdown, where you can select or search for the appropriate location.
Verify the Submit Action
Ensure the Submit Action field is set to Held by and Assigned.Note: This is the default setting, but it can be modified in Settings > Assets > Asset Settings > Assign/Turn In Screen Settings.
Use Held by and Assigned unless you only need to update the Held by field. For example, if a student’s device is collected at the end of the school year and will be reassigned to them in the fall, you can set the Held by status to school inventory during the summer and reassign the device later.
Submit the Turn-In
Click
 to complete the asset return.
Click
 to clear all entered fields and start over.


