Student Settings - Legacy
- 08 Oct 2025
- 1 Minute to read
- Contributors

- Print
- DarkLight
- PDF
Student Settings - Legacy
- Updated on 08 Oct 2025
- 1 Minute to read
- Contributors
- Print
- DarkLight
- PDF
Article summary
Did you find this summary helpful?
Thank you for your feedback!
The Student Import Settings screen houses the settings that control student imports. You will need to set these up before being able to perform a student import.
Click the Enable check box to turn on student imports. Check the Create student logins check box if you want to create logins for the students that are being imported. Check the Full email login check box to create the full email address as a login and if it's not checked it will just use the first part of the email before the @ as a user login if you have chosen to create student logins above. Note: If using Google G Suite to provide the student information, it has to be full email as login. If you're using Active Directory to provide the information then you can use either full email as login or not.
Lines to skip should be 1. Set the Active or Inactive value for students based off of what is in the import file. Ex.) Active/Inactive, 0/1, etc. Set the Import Delimiter as either Tab or Comma based on the format of the file you're importing.
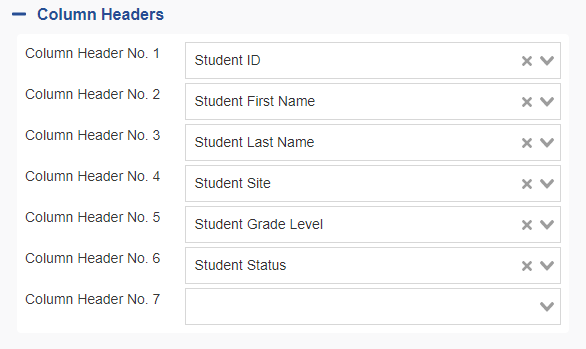
Click the Column Headers drop down to expand it. This is where you will choose the Headers that are in the file. The headers need to be put in the same order on this screen as they will be in the file. You only have to do this once as long as you're importing the same fields each time.
The 6 required fields are Student ID, Student First Name, Student Last Name, Student Site, Student Grade Level, and Student Status.
Once you've put the headers on this screen, click the ![]() button at the bottom of the screen (You only have to do this once as long as you're importing the same fields each time).
button at the bottom of the screen (You only have to do this once as long as you're importing the same fields each time).


Was this article helpful?