Student Importer - Legacy
- 25 Nov 2025
- 1 Minute to read
- Contributors

- Print
- DarkLight
- PDF
Student Importer - Legacy
- Updated on 25 Nov 2025
- 1 Minute to read
- Contributors
- Print
- DarkLight
- PDF
Article summary
Did you find this summary helpful?
Thank you for your feedback!
The Student Importer is for importing student files. This is the most efficient way to add students in bulk into the system. The file that you import has to be an excel file in .CSV format (comma delimited).
A student import file has 6 fields that are required to be able to import the file, every other field is optional. Unlike the asset importer, the student importer requires you go to into the settings to set which fields you will be importing but you only have to set these fields ONCE. The 6 required fields are Student ID, Student First Name, Student Last Name, Student Site, Student Grade Level, and Student Status.
If you click the Logs button in the top right, it will show you the last 10 imports that were performed. You can also pull the file that was imported for each of them too by clicking the File link on the right side (See Below).

To start a student import, go to Imports tab, then Students. Then click the Settings button in the top right.

The Student Import Settings screen will pop up and this is where you will choose the Headers that are in the file. The headers need to be put in the same order on this screen as they will be in the file.
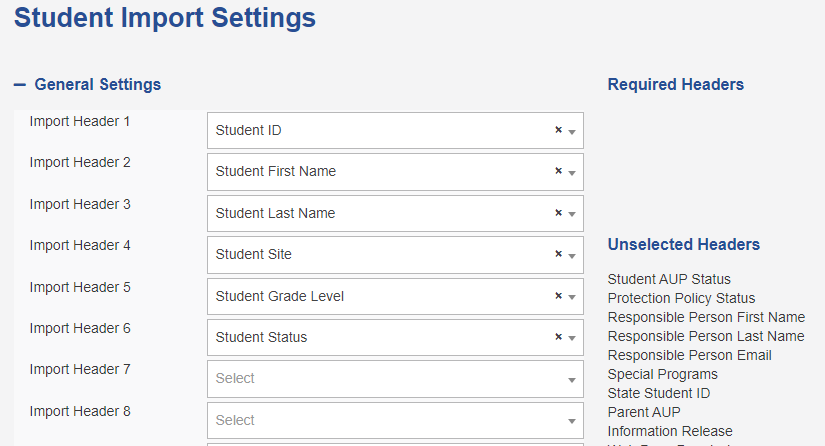
Once you've put the headers on this screen, click the ![]() button at the bottom of the screen (You only have to do this once as long as you're importing the same fields each time). Then go back to the Student Importer.
button at the bottom of the screen (You only have to do this once as long as you're importing the same fields each time). Then go back to the Student Importer.

From here, click the Choose File button and select the student file that you are importing. Then click ![]() .
.
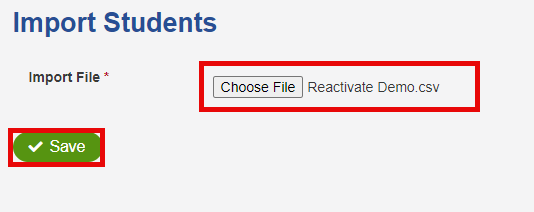
After clicking ![]() , you should see a message pop up at the top of the screen saying that new users were added.
, you should see a message pop up at the top of the screen saying that new users were added.
The results of the import won't show up on this screen. You will need to click the Logs button in the top right to see how many student records were added or updated.
Was this article helpful?